Marlowe the Adorable Sphinx

Part 1: Create a Contour Drawing of Marlowe

Supplies: tracing paper, HB graphite pencil, ruler

My first goals are to outline a drawing space on tracing paper, add a line of symmetry, and draw one side of Marlowe’s head.

Step 1: Press gently with an HB pencil to outline a 9 by 12 in drawing space (the size of the canvas I plan to use) on tracing paper. Draw a line of symmetry down the center of the drawing space.

Step 2: Outline half of Marlowe’s head on one side of the line of symmetry.

Blog 1

Step 3: Place a sheet of tracing paper over your outline of half of Marlowe’s head. Tape the tracing paper in place. Trace over both the line of symmetry and your outline drawing with a 6B pencil.

Step 4: Flip the drawing (on tracing paper) over to the other side with the graphite side down and tape in place. Line up this half of the drawing along the line of symmetry. Trace over the outline again to transfer the other half of the cat onto your drawing paper.

Blog 2

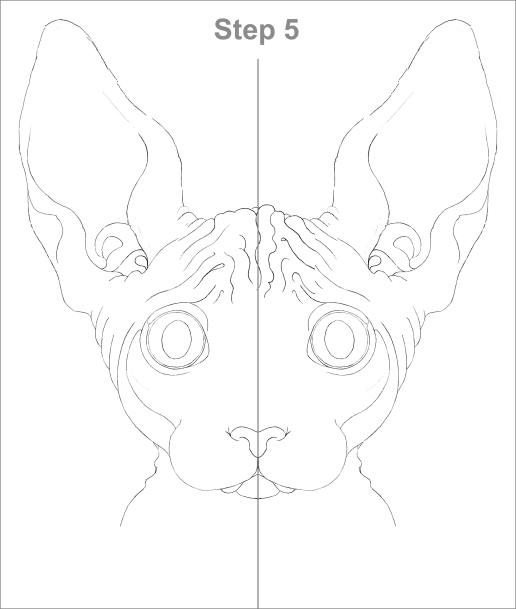
Step 5: Remove the tracing paper and you have a symmetrical drawing of Marlowe. Touch up any sections that didn’t transfer accurately.

Blog 3

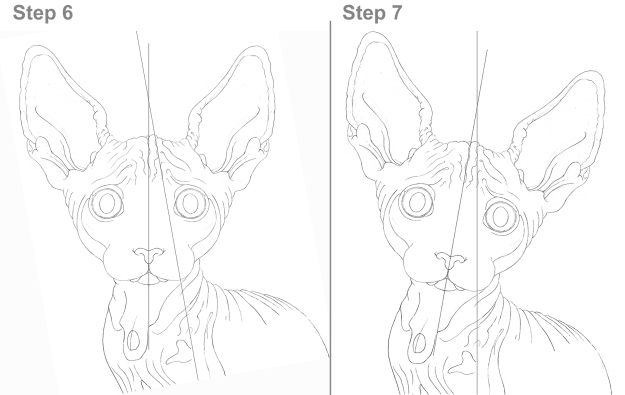
Step 6: Complete the drawing of Marlowe by adding her neck, body, and additional details. These outlines serve as guides for painting each part of him in the correct place on the canvas.

Step 7: Rotate your drawing slightly toward the right. She looks so much cuter with her head tilted to one side. Check over your drawing from top to bottom and erase/redraw any sections that you’re not happy with.

Blog 4

Part 2: Getting Ready to Paint

Refer to the following step-by-step instructions to transfer a drawing to a canvas:

Supplies: your drawing, 9 in by 12 in stretched canvas (or canvas board), Scotch tape, 6B and HB graphite pencils, pencil sharpener, spray fixative.

  1. Compare your drawing to mine (below) and make any changes if needed. Note that the first line of symmetry was erased.
  2. Turn your drawing upside down on a smooth surface and sharpen a 6B pencil.
  3. Make a stencil: hold the pencil at an angle and shade in the backside of the paper  wherever the outlines are. Make sure all your outlines are covered with graphite by holding the drawing in front of a bright light.
  4. Use a facial tissue or paper towel to very gently blend the graphite. You need to leave enough graphite on the reverse side to transfer the drawing to a canvas.
  5. Position the drawing right side up on the canvas (the coating of graphite is on its reverse side). Tape the drawing securely in place along one side so it can’t accidentally move.
  6. Use a sharpened HB pencil to trace over all sections of your drawing. Before you remove the tape, lift the tracing paper to confirm everything transferred.
  7. Spray the canvas with two or three coats of a fixative so the graphite won’t eventually bleed through the paint.

Blog 5

Part 3: Mix Colors and Paint a Background

Only six colors (plus white to lighten a color’s value) can create every color you can see or imagine: Raw Umber, Burnt Sienna, Cadmium Yellow, Yellow Ochre,  Cadmium Red, and Alizarin Crimson. Here’s a basic color wheel using only these colors:

Blog 6Painting any subject on a white canvas distorts the subject’s values/colors. I’ve chosen medium values of mostly blue for a preliminary background. (The final background colors will be added after the under-painting of the cat is finished.)

  1. Choose and mix paint colors for your background.
  2. Thin the colors with a little water.
  3. Use a small brush to paint along the outer contours of Marlowe.
  4. Paint the entire background with a larger brush.
  5. Use a script liner brush and thinned white paint to “re-draw” any contour lines hidden under the background colors.

Blog 7

A little color is added to the ears. The next goals are to mix colors to paint Marlowe’s ears and outline her body.

Part 4: Paint Ears and Outline the Body

  1. Examine the various pink/red colors used to paint the inner sections of Marlowe’s ears.
  2. Use Cadmium Red and White to mix four or five values of pink from almost white to dark pink.
  3. Use Burnt Sienna and white to mix a few different light brown colors.
  4. Mix Burnt Sienna with a little Raw Umber to create a few darker brown colors.
  5. Add a little water to each color/value.
  6. Take your time and add a thin layer of color to both ears as shown below. (You should still be able to see faint pencil lines through the thinned paint.)
  7. Use a script liner brush and diluted Burnt Sienna to neatly outline Marlowe’s ears, face, and body.

Blog 8


Part 2: Blood, Costumes, and Giggles

Inside the huge gymnasium, adult volunteers hung heavy, dark fabric walls to section off a pathway through the haunted house. Along the pathway, individual rooms/spaces were set up with electricity for special effects (fire department approved). Each group of volunteers/art students chose a scary exhibit theme and then decorated and added props to their space. Costumes and make-up designs were planned and created by each participant. The production was a huge success and a ton of fun for everyone.

During the dress rehearsal, I took lots of photos, which eventually inspired me to create this colored pencil drawing.

BLOG HAUNTED HOUSE COLOR

Part 1: Super Scary Haunted House!

Several years ago, as Halloween approached, our community recreational center asked me to help organize a haunted house production. Within two days, we were offered a huge double-size school gymnasium and had over 50 volunteers. My role was to design a scary mural to surround the entry door. We soon had several huge rolls of heavy paper, oodles of bottles of paint, and 30 of my art students to draw and then paint a mural 11 ft high by 13 ft wide.

Isn’t this the scariest haunted house sketch you’ve ever seen?

Drawing for Haunted House Production

Drawing for Dummies

My very first book!

In early 2002, an email dropped into my inbox from a complete stranger named Jessica Faust, asking me if I would be interested in writing a book on drawing. After the initial euphoria died down, I began to suspect that this was a hoax. I wrote her back and said “yes” anyway.

The rest is history! I later found out that Jessica was an acquisitions editor for Wiley. Drawing for Dummies, was published internationally in March, 2003 by Wiley Publishing Inc., New, York, NY, USA. In February, 2011, the 2nd Edition, co-authored with Jamie Combs, was released with updates to drawing technologies.

1 2019

Obituary Pamela Hoddinott (1926- 2019)

Pamela (Sparkes) Hoddinott, age 92, passed away peacefully on Friday, June 21, 2019 at the Cedarstone Enhanced Care Nursing Home in Truro, Nova Scotia.

0 Blog Mom

Mom holding her newborn grandson Adam (Karen’s son)

Pamela was born Dec 5, 1926 in the historical city of St. John’s (Newfoundland), and grew up in the picturesque, quaint fishing village of Lower Island Cove, Conception Bay. As a child, she learned to play the piano and continued her love of music throughout her life.

On Aug 19, 1948 she married Lloyd Granville Hoddinott in St. Johns and they later moved to Corner Brook where their family resided for twenty-five years.

From 1977 to 1984, she expanded her life-long interest in art by taking oil-painting courses at Memorial University in Corner Brook and privately with well-established artists. During this time, she exhibited at art galleries in St. John’s and Corner Brook.

After her husband’s retirement, Pamela and Granville moved to Nova Scotia to be closer to their children and grandchildren. Pamela was delighted to discover lively art communities near their home in the Annapolis Valley. In addition to taking art courses at Acadia University, she attended workshops and classes in Halifax taught by well-known Canadian artists. From 1988 to 1990, she had eight artworks accepted in Contemporary Art Society juried shows. As a member of the Association of Atlantic Amateur Artists, her work was honored with two awards (1990), including first place for a colored pencil drawing.

Pamela and Granville later moved to Truro. As a member of the Truro Art Society, she exhibited and sold paintings at the Colchester Regional Hospital Corridor Gallery.

Left to honor her life are three children (Brenda Hoddinott, Peter Hoddinott, and Karen Unicomb), five grandchildren (Heidi and Benjamin Thomson, Colin, Adam, and Amy Unicomb, and Claire Hoddinott), two great-grandchildren (Brandon Porter and Kaiden Purdy), and several nieces and nephews. Pamela was preceded in death by her parents (Louis and Amy Sparkes), husband (Granville Hoddinott), and siblings, Gladys, Daphne, John, and Peter Sparkes.

Pamela’s family extends their gratitude to the staff at Cedarstone Enhanced Care Nursing Home in Truro for their attentiveness and loving care. As per Pamela’s wishes, no funeral service will be held.

Discover Your Artistic Talent

Ignorance really is bliss! I had been drawing for several years before I found out “talent” even existed. Had I assumed artistic abilities were the result of talent, I may have simply sat on my butt and waited for strong skills to magically appear.  :)

Talent is universally misunderstood. My most recent eBook provides insights into misconceptions that might discourage you from learning to draw and/or paint.

I’ll be publishing this book soon…

S10 COVER.jpg

Happy Holidays to Family and Friends!

People all over the world are celebrating and enjoying holidays over the next couple of months. Regardless of religious or cultural differences, we all share our love of family and/or friends.

This oil painting of my daughter’s Dalmatian (named Shadow) represents the fun aspects of this holiday season. In reality, Shadow didn’t have reindeer antlers, but she did have a brown eye and a blue eye!

Wishing you peace, joy, and laughter! Brenda

Shadow blog.jpg


Happy 92nd Birthday to my Mom!

Today, I am thinking about and celebrating my Mom (Pamela Hoddinott).1 Mom trying to get her pet goat to look at the camera.jpg

She was born in St. John’s, Newfoundland in 1926 and grew up in the beautiful fishing community of Lower Island Cove.

She loved school, playing piano, and tending her pet goat.

When this first photo was taken, she was trying to convince her goat to look toward the camera.

Her older sister, Daphne (on the right in the second photo) was also her best friend.

Whenever they were together, the sound of their laughter seemed to travel for miles.


A few years after marrying my dad, their first child (me) arrived.


This picture of Mom and grumpy-looking-me was taken in Lower Island Cove in 1952.


3.jpg


My brother (Peter) and sister (Karen) were later born in Corner Brook.

My Mom and I have always shared a love of creating art, especially drawing and painting.

Throughout the past 50 years, we enjoyed travelling together in Canada and the USA taking photographs as painting references.

I love you Mom – have a wonderful birthday tomorrow!

Can You Find Hidden Images?

The goal of  most realists is to accurately paint their subjects – a child looks like a child and a twig looks like a twig….BUT…

Look closer – much closer! Twigs can also be the homes of imaginary beings. How many can you find in this close-up view of a painting?

NOV2018 2.jpg

How many beings (including me) are hiding in this close-up view of the same painting?

NOV2018 3.jpg

Answer: 6! One is in the upper right, lower left, and center section of each close-up view.

NOV2018 4.jpg

This baby dragon was fun to create.


The  little boy in the painting (below) is my long-time friend Benny.

I was drawn to (pun intended) his capacity to always find the good in everyone and view our wondrous world through the eyes of child.

My idea became reality the day he showed me a photo of himself as a small child.


NOV2018 1.jpg